JSystem User Manual (V2.0)


09/21/2004

Author: Guy Arieli

General 1

New in version 2.0. 1

Runner/Scenario builder 2

Fixture management 4

Enhance reporting. 8

SUT independent 11

System Object 12

Analyzers. 16

System Objects. 17


General

JSystem is a framework for writing and running functional/system automated tests, based on JUnit. It’s highly recommended to be familiar with JUnit before starting to work with JSystem.

This framework is a collection of features that target to improve the maintainability and visibility of your automation project.

JSystem comes with a runner user interface that extends the JUnit user interface. All the features will work by using the original UI runner or any other runner. So if you execute your tests using Ant or IntelliJ Eclipse or any other environment, the features are expected to work.


New in version 2.0

Runner

In this release you will find new runner that better support all JSystem capabilities. The ability to run JSystem with any JUnit runner was kept.

Publisher

Enable to edit scenario run results and publish them to an Html server.

Scenario

Enable to define the order of the tests in the scenario.


Runner/Scenario builder

Following is the new look of the tests runner/ scenario builder:


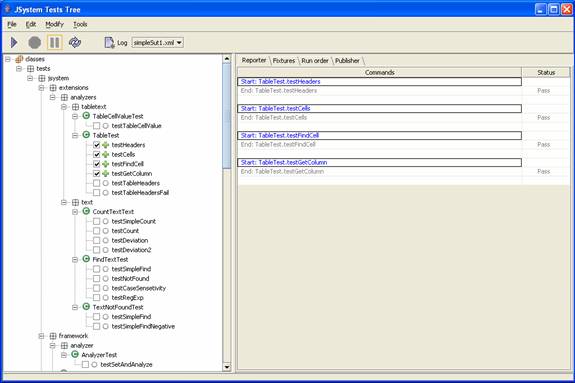
This UI is used to define/ load the tests scenarios / suite you would like to run and run them.

On the left side of the windows you can see a tree of the tests in your classpath. You can select tests by checking the tests checkbox and press the play button to run them.

On the right side of the window you can see 4 modules:

Reporter

Enable you to see an online run report. Only the steps titles and it status are available in this report.

The Html report is available in menu Tools->Reports->Html.

Fixtures

See Fixture management section.

Scenario

Using the scenario tab you will be able to change the tests running order.

When standing on the tests tree root and pressing the right mouse button the following popup menu will be available:


Check Selection – will check the current sub tree.

Uncheck Selection – will uncheck the current sub tree.

Set as current – will set this tree root as the current tree root.

Save scenario as … - will save the current scenario. The scenarios are in XML format files in the scenarios directory under the tests classes path.

Load scenario – will load saved scenario.


Publisher

Extendable mechanism for running results publishing.


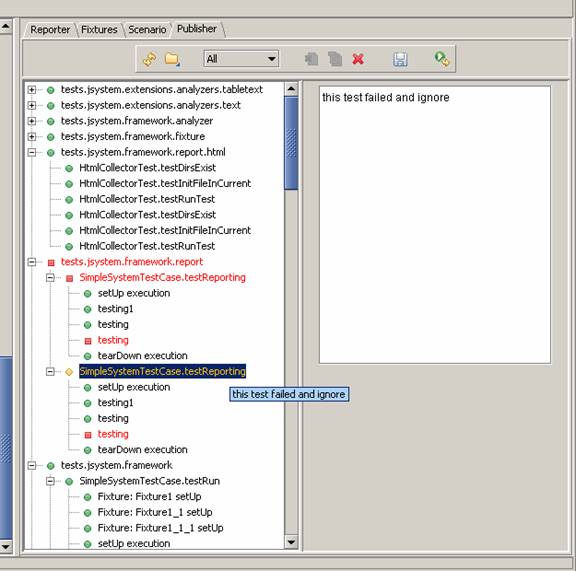
After the scenario run is finished go to the publisher tab.

Press the reload button () to load the run results. You can use this button to undo your changes.

You can load external report xml file ().

The combo-box is used to filter result the default is to view all the results. You can select ‘Fail only’ to view only the results that failed and ‘Fail & Ignore’ to see also ignored reports.

You can select a test and delete it (). Or you can ignore it.

Use this one () for saving the report.

Use the publish button () to send the result to a web server.

Fixture management

Fixture management in general enables you to create a tree of fixtures then you can assign tests to position in the fixture tree (for more details about the concept).

What is a fixture?

A fixture represents a state of the Software/System you are testing. Let’s say you are testing a web application. One fixture (and obviously the basic) can be your machine without anything install on it, you can define it as your root fixture. A second fixture can be the machine install with the application you are testing. Additional fixture can be your application configured with some data.

To define a fixture 2 things should be defined: setup – the way to get to the fixture and teardown – the way from the fixture to it parent state.

In our model the fixture are arranged in tree. Every fixture can is pointing to it parent fixture.

Why do you need fixtures?

Every test, especially functional/system test has a fixture. In some of the cases the fixture is very complicated. A not so good solution to the problem will be to enter the fixture setting to the test itself. Fixture management gives better alternative.

How the fixture tree navigation is done?

If not configured otherwise, the default system status will be the root fixture. If you run a test that is not under the current fixture (root), all the fixtures along the path to the required fixture will be executed first and only then the test will be executed.


Fixture1.java file

package jsystem.tests.framework.fixture;

import jsystem.framework.fixture.Fixture

;

public class Fixture1 extends Fixture{
    public void setUp() throws Exception {
        System.out.println("Fixture1-setUp>>");
       // Here you will enter the fixture setup
    }

    public void tearDown() throws Exception {
        System.out.println("Fixture1-tearDown>>");
       // Here you will enter the fixture teardown
    }
}


Fixture1 is an example for a test fixture. What can we learn from it?

Classes javadoc:

Fixture

RootFixture

FixtureListener

FixtureManager


Fixture1_1.java file

package jsystem.tests.framework.fixture;

import jsystem.framework.fixture.Fixture;

public class Fixture1_1 extends Fixture{
    public Fixture1_1(){
        setParentFixture(Fixture1.class);
    }
    public void setUp() throws Exception {
        System.out.println("Fixture1_1-setUp>>");
    }

    public void tearDown() throws Exception {
        System.out.println("Fixture1_1-tearDown>>");
    }
    public void failTearDown(){
        System.out.println("Fixture1_1-failTearDown>>");
    }
}


From this example you can learn:


SimpleSystemTestCase.java file

package tests.jsystem.framework;

import junit.framework.SystemTestCase

;
import tests.jsystem.framework.fixture.Fixture1_1;

public class SimpleSystemTestCase extends SystemTestCase{
    public SimpleSystemTestCase(String name){
        super(name);
        setFixture(Fixture1_1.class);
    }
    public void testRun() throws Exception{
        System.out.println("SimpleSystemTestCase-testRun>>");
    }
    public void tearDown(){
    }
}


The important points here are:


We just created a small tree of fixtures (Fixture1 and Fixture1_1) and we connect a test (SimpleSystemTestCase) to one of the tree leafs (Fixture1_1).

An additional option for a test is to set the setTearDownFixture. If the test will fail the framework will teardown on the fail pass (failTearDown) to the requested fixture.

When JSystem is loaded it assumed that the system you are testing is in the root position.

As part of this feature you have an UI that can help you managing your system. You will find it Fixture Manager in the fixture tab.


The fixture manager UI is available only if the JSystem TestRunner was executed.

You can see the tree of fixtures. The blue point represents current position in the fixture tree.

You can select a fixture and push the “go to…” button, the fixture path to the selected fixture will be executed.

The “set current” will move to the selected fixture without executing anything.

Disable checkbox will block any fixture execution.

Enhance reporting

JUnit support a very basic level of reporting. Only failures are logged. In system testing were the test complexity increase and the tests execution time are longer you need a mechanism to report on every step of the test. This way you will be able to monitor the test flow and understand the cause of the failure. You would also want to keep historical run result.

To add a report you should use the report object (public & static) in SystemTestCase.

So this feature is made out of 2 parts. One is extendable interface that will enable you to add more reporting capabilities. The second is a html reporter that will give you an hierarchal view of your tests.

Extendable interface

In order to add you own reporting capabilities you should implement the TestReporter interface. This interface has 4 methods:

  1. report – will be called when a new report is add.
  2. getName – should return the reporter name to be presented.
  3. asUI – return true is this reporter as a UI. You will be able to see this reporter in the tools->reporting menu.
  4. initReporterManager – if the asUI is true this method will be launch when the user select it on the reporting menu. A kind of frame or dialog should be presented to support the configuring or managing the reporter.

The reporters can implement two other interfaces: TestListener and FixtureListener. If implemented they will called automatically on tests or fixtures events.

To initiate your reporter you should add its class name to the “reporterClasses” system parameter.
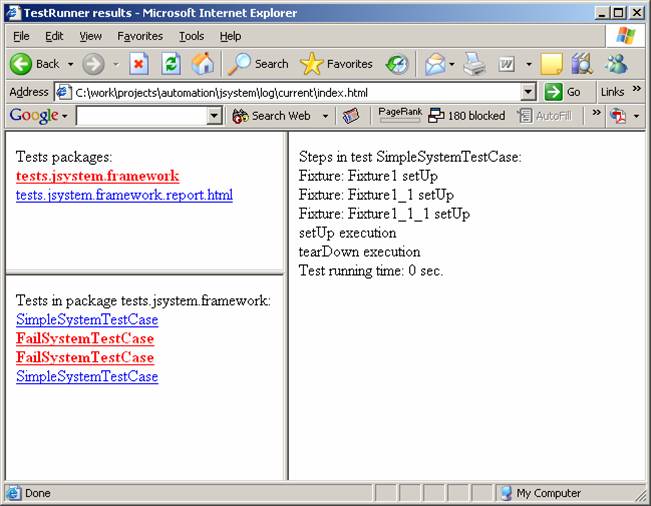
 

Html reporting

Html reporting is the default reporter that will be used.

To launch it go to the menu Tools->reporting->html report.

You will get something like this:


In the upper left frame you have a list of all the packages of the tests that were executed. When you press on one of the packages on the lower left frame you will see a list of all the tests in this package. If you select one of the tests you will see it details in the right frame.

When the JSystem UI is executed all the old logs are zipped to a file. You can fine all the old logs in the ‘old’ directory under the log directory.

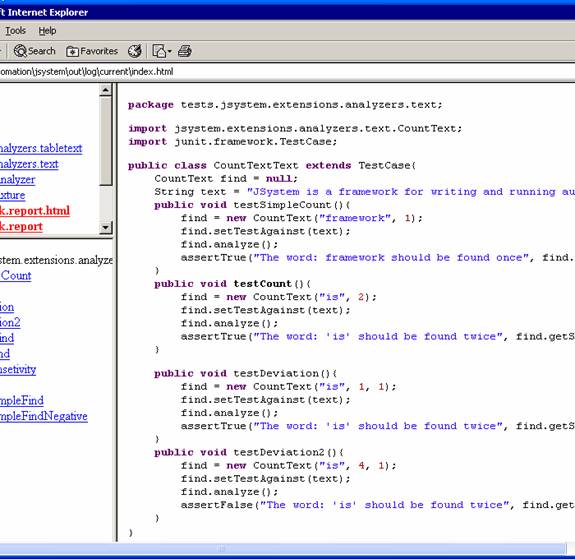
By setting the testsSrc attribute in the jsystem.properties file:

testsSrc=./tests

You will be able to see the tests sources in the report.

Any attributed added to summary.properties file will be added to the summary report. You can add information like setup name and description version number and more.


SUT independent

SUT stands for System/Software Under Test. Usually in your testing lab you will have more then one setup and you would like your test to run on all the setups without making any changes to it. Let’s say you are testing a web application, in your lab you have few application servers with deferent URLs, if you hard coded the URL to the test it will be able to run only on one of your application servers.

To solve this problem we ask you to define your System/Setup using an XML file. Your sut file should appear like the following:


sut/xml4test.xml

<sut>
    <appServer>

        <url>http://app1/index.html</url>
        <user>guy</user>
        <password>guy</password>

    </appServer>
</sut>


Now to use this information in your file see the following example:

MyAppTest.java

package tests.jsystem.framework.sut;

import junit.framework.SystemTestCase

;

public class MyAppTest extends SystemTestCase{
    public void testBasicUrl() throws Exception{
      String url;
      url = sut.getValue("/sut/appServer/url/text()");
      browser.getNavigator().getDocument(url);
    }
}


sut is an object in SystemTestCase that is initialized by the framework. It represents the XML file in the example above. To extract a value from the XML it uses XPath syntax.

To set your default SUT file use the sutFile property in the jsystem.properties file (located in the running directory). The sut XML file can be anywhere in the class path (including inside a jar file).

System Object

System Object is a convention to represent the setup/system you are working on with a single object. The steps in the tests will be operations on the setup/system object.

I would like to explain it by going through an example.

Lets say you are testing a web application and your setup is made of an application server and database server. Your tests use 2 interfaces: a web interface to work with the application server and ODBC interface to work with the database. Your sut file should look something like the following:

sut/simpleSut1.xml

<sut>
    <setup>

        <class>systemobject.examples.AppServerSetup</class>

        <web>

            <class> systemobject.examples.Web</class>

            <url>http://app1/</url>

        </web>

        <db>

            <class>systemobject.examples.DataBase</class>

            <dbServerName>dbserver1</dbServerName>

            <user>guy</user>
 
           <password>guy</password>

        </db>

    </setup>

</sut>


This XML file represents 3 objects, the application server setup object that hold the web interface object and the database object. Every one of the objects has a class element. The class element is used to construct the system object.


First of all let’s see how a test that uses the system object looks like:

SystemObjectExampleTest.java

package examples.systemobject;

import
junit.framework.SystemTestCase;

public class SystemObjectExampleTest extends SystemTestCase{
    AppServerSetup setup;
    public void setUp() throws Exception{
        setup = (AppServerSetup)system.getSystemObject("setup");
        setup.web.addUser("user1", "user1");
    }
    public void testAddUser() throws Exception{
        setup.db.assertShouldBeFoundInTable(DataBase.USERS_TABLE, DataBase.USER_FIELD, "user1");
    }

    public void tearDown() throws Exception{
        setup.db.deleteFieldEntry(DataBase.USERS_TABLE, DataBase.USER_FIELD,"user1");;
    }

}


In the setUp we can see how the SystemObject (system) is used to initialize the setup object. Then the web and db object are used to managing and testing.

Note: by default the object that is initialize will be initializing once. The next test that will use the object will get the same object.


Now let’s look at the 3 class implementations:

AppServerSetup.java

package systemobject.examples;

import
jsystem.framework.system.SystemObjectImpl;

public class AppServerSetup extends SystemObjectImpl{
    public DataBase db;
    public Web web;
}


This class doesn’t have an internal logic, it just hold the objects. Every system object in the object tree should extends SystemObjectImpl or implement SystemObject The important thing here is that the name of the fields (db and web) should be identical to the xml tag. The initialization of those fields will be done automatically (using reflection).

All the system object classes should be excluded from the JUnit class loader. In this case systemobject package is excluded. You can use excluded.properties files located in the junit.jar to exclude other packages.


DataBase.java

package systemobject.examples;

import
jsystem.framework.system.SystemObjectImpl;
import
java.sql.Connection;
import
java.sql.SQLException;

public class DataBase extends SystemObjectImpl{
    public static final String USERS_TABLE = "users";
    public static final String USER_FIELD = "user";
    public static final String PASSWORD_FIELD = "password";

    private String dbServerName = null;
    private String user = null;
    private String password = null;
    private Connection connection = null;
 
    public void init() throws Exception{
        super.init();
        dbServerName = sut.getValue(getXPath() + "/dbServerName/text()");
        user = sut.getValue(getXPath() + "/user/text()");
        password = sut.getValue(getXPath() + "/password/text()");
        initConnection();
    }

    public void assertShouldBeFoundInTable(String tableName,

                                           String fieldName,

                                           String value){
        // implementation
        // ...
    }

    public void deleteFieldEntry(String tableName,

                                 String fieldName,

                                 String value){
        // implementation
        // ...
    }
    private void initConnection() throws SQLException{
        // init connection implementation
        // ....
    }
    public void setDbServerName(String dbServerName){
        this.dbServerName = dbServerName;

    }
}


We can see that DataBase extends SystemObjectImpl as well. The init method will be called by the framework on the object initialization. The system object have access to the sut XML file and it can and should be used to init the internal fields (user and password). Other option to init a field is by creating a setter (setDbServerName) with the XML tag name (dbServerName). The setter method should have a string as a parameter. The framework will call the set method automatically.

The setter types that are supported are: int, long and String.


Web.java

package systemobject.examples;

import
jsystem.framework.system.SystemObjectImpl;


public class Web extends SystemObjectImpl{
    private String url = null;
    public void init() throws Exception{
        super.init();
        url = sut.getValue(getXPath() + "/url/text()");
    }

    public void addUser(String user, String password){
        // implementation
        // ...
    }
    public void removeUser(String user, String password){
        // implementation
        // ...
    }

}


When developing a system object you should consider using the following guidelines:


Analyzers

Analyzers give you an easy way to analyze the results of your test steps.

Following is an example of a test that uses analyzers:


AnalyzerTest.java

package tests.jsystem.framework.analyzer;

import
junit.framework.SystemTestCase;
import
systemobject.tests.Device1;
import
jsystem.extensions.analyzers.text.FindText;
import
jsystem.framework.analyzer.AnalyzerException;

public class AnalyzerTest extends SystemTestCase{
    Device1 device;
    public void setUp() throws Exception {
        device = (Device1)system.getSystemObject("device1");
    }
    public void testSetAndAnalyze() throws AnalyzerException {
        device.telnet.dirCommand();
        device.telnet.analyze(new FindText("Program Files"));
    }
}


In this example you can see the analyze method that come from inheriting from SystemObjectImpl. In this case the analyze tests that the string “Program Files” is found in the previous dirCommand. The result of the dirCommand (in this case String) is set to the Analyzer using setTestAgainsObject method.


You can write your own analyzers by extending AnalyzerParameterImpl (or by implementing AnalyzerParameter).


Following is an example for an AnalyzerParameter:


FindText.java

package jsystem.extensions.analyzers.text;

public class FindText extends AnalyzeTextParameter {
    protected boolean isRegExp = false;

    public FindText(String toFind){
        this.toFind = toFind;
    }
    public FindText(String toFind, boolean isRegExp){
        this(toFind);
        this.isRegExp = isRegExp;
    }

    public void analyze() {
        if (testText == null){
            title = "Text to analyze is null";
            status = false;
        }
        message = testText;
        if (isRegExp){
            status =testText.matches(".*" + toFind + ".*");
        } else {
            status = (testText.indexOf(toFind) > 0);
        }
        if (status){
            title = "The text: >" + toFind + "< was found";
        } else {
            title = "The text: >" + toFind + "< wasn't found";
        }
    }
}


The FindText is an AnalyzerParameter that verify that a certain string is found. It support regular expressions.

The analyze method will do most of the work here. testText is a String that will be set by the system object using setTestAgainsObject method.

The analyze method should set the value of 3 fields: the title, the message and the status. If the status is set to false the test will be failed (by throwing an exception).

All the results will be report to the reporter.


System Objects

CLI System Object

The CLI (Command Line Interface) is simple interface to operate CLI connection. It can work on top of Telnet and RS232.

Using the system object XML configuration mechanism you can easily integrate your CLI without having to change any code.


<sut>
    <box>
        <class>sytemobject.Box</class>
        <cli>
            <class>sytemobject.terminal.CliObject</class>

            <host>1.1.1.1</host>
            <prompt commandEnd="true">#</prompt>
            <prompt sendString="admin">User:</prompt>
            <prompt sendString="admin">Password:</prompt>
            <prompt sendString="enable">></prompt>
            <prompt sendString="">--More-- or (q)uit</prompt>
            <errors>Invalid input detected;error</errors>
            <timeout>40000</timeout>
        </cli>
    </box>
</sut>


This is an example of Cisco like CLI configuration. First of all you have the class definition. Then you have a few settings like useTelnetInputStream, host (the host, for example, can be “com1”), errors and timeout.

The interest thing is the prompt configurations. The setting of the prompt will define the CLI behavior. A prompt is defined as the text that appears after CLI scrolling end. In this case a few prompt are defined. When commandEnd is set to “true” (the default is false) the CLI operation ends. In this case it will append when the “#” is appeared. It will not catch the ‘#’ character if it appears as part of the CLI text but only if the CLI scrolling ends. All the other prompt will be handle automatically: for the “User:” prompt the “admin” string will be send, the same for the “Password:” prompt, for the “>” prompt the “enable” command will be send and for “—More—or (q)uit” prompt a enter will be send. So any prompt that is not the commandEnd prompt will be handled automatically.

So all you have to do is to send a command and analyze the result.


Following is an example for a test that uses the CLI object:

    public void setUp() throws Exception{
        box = (Box)system.getSystemObject("box");
    }
    public void testDemo() throws Exception {

        report.step("Configuring box vlans");
        box.addVlanRange(2, 4);
        box.cli.command("configure");
        box.cli.command("interface 0/2");
        box.cli.command("vlan participation exclude 1");
        box.cli.command("exit");
        box.cli.command("exit");
        box.cli.command("show vlan 1");
        box.cli.analyze(new TableCellValue("Interface","0/2","Current", "Exclude"));
      //...
    }


The “show vlan 1” command should return the following table:


show vlan 1

VLAN ID: 1     
VLAN Name: Default
VLAN Type: Default

Interface   Current   Configured   Tagging 
----------  --------  -----------  --------
0/1         Include   Include      Untagged  
0/2         Exclude   Exclude      Untagged  
0/3         Include   Include      Untagged  
0/4         Include   Include      Untagged  


#


We would like to check that port 0/2 is excluded.

So we use the analyze method just after the “show vlan 1” command. We use the TableCellValue analyzer that analyzes text tables. In this case it will verify that the row contains “0/2” in the “Interface” column will contain “Exclude” in the “Current” column.


Note: in order to use the CLI interface the cli.jar file should be included in the project classpath.


SourceForge Logo